

Derbyshire Textile Artist Tour: How To Hand Process Flax
- amanda haran

- Apr 17, 2025
- 14 min read
Updated: Apr 26, 2025
Flaxland Workshop
How to hand flax process learning is now in the bag (though the associated skills need a little more practice) as I took being a contemporary community textile artist based in picturesque Derbyshire, UK, to Flaxland, Thrupp. Always passionate as a textile artist and keen to learn, I'd wanted to attend a hand flax processing course at Flaxland for ages, a place renowned for its commitment to sustainable textile practices. Led by the fabulous trainer Simon (and sometimes Ann and their gaggle of dogs), who lives and breathes flax, it was a bloomin' joy on a bloomin' sunny April day alongside the babbling Frome - idyllic.
Recognising The Long History Of Flax: A Journey Of Discovery
Flax is argued to be one, if not the oldest, plant used for its fibres. Archaeologists, alongside paleobiologists, found evidence of flax fibres in a Georgian cave that, once dated, were found to be around 34,000 years old. Linking my special interest areas, some fibres were twisted, indicating they were used to make ropes or strings.
Despite the enormous passing of time, flax still has a special place in the textile industry as the source of linen, the fabric we know. Its breathability and durability are unmatched, and its history is truly fascinating. With encouragement from Simon, I joined Berta's Flachs' group to delve deeper into its heritage. While recognising the decline of the flax crop, our association is inspired by Gustave Mahler's words:
'Tradition is not the worship of ashes, but the passing on of fire.'
Our aim is to uncover the historical stories surrounding flax and revitalise its modern cultivation and use as a versatile textile. This isn't just a local effort; it's a worldwide push for better sustainable practices in the textile industry, and I'm proud to be part of it. Little did I know when I started this hair-brained scheme that I'd become part of a 'movement.'
Flax was widely grown in Derbyshire, UK, from the 16th to the 19th centuries. Drilling into its hyper-local existence, I unearthed the Ripley Flax Factory, which became The British Hemp & Flax Development Company Ltd., a manufacturer of such importance that MPs debated its 1956 closure in Parliament. I intend to visit the former factory site at Heage Road to sense the ghosts of our heritage and see what remains.
While I am unsure about the specific outputs of flax at the Ripley Flax Factory, there are modern references to it in local place names, such as Flax Croft and Rope Walk. Flax Croft was mentioned by Reginald Johnson as
Three centuries ago, locals would have seen lime-bleached linen stretched on wooden frames, drying and whitening in the sun and wind. My preliminary investigations indicated that rope-making played a crucial role in the extensive local mining industry, where sturdy ropes were essential for lifting coal and other materials from deep underground. In the flax processing course, Simon guided us through the history of flax and the various linen products, including linen fire hoses, which were also likely used in our Derbyshire mines.

The Flaxland course brought together my experiences of growing, researching, and mastering flax processing in a beautiful harmony. The joy of learning and the sense of accomplishment were palpable. I'm excited to share the highlights of this experience with you, hoping to inspire and motivate fellow textile artists and enthusiasts.
Assessing My Flax Crop & Its Quality
I gathered my bundled, unprocessed, retted flax into the boot of the car, and it, too, went on tour to Thrupp to be assessed by the keen Flaxland peeps. When growing, it hadn't been my intention to test the resilience of my seed, but travels abroad often left the crop unattended in its heavy clay, former coal mining soil. Weeds did take hold at one point, and I'm embarrassed to say that it was not watered once (not even during germination.) With hindsight, this poor cultivation practice has taught me that flax is truly tolerant, tough and well placed to be a successful species for a community project.

I'm proud to share that my flax crop from my first year was assessed by Flaxland and judged as good quality (woo hoo), even though I used short-fibre variety seeds of Linum usitatissimum (primarily grown for their seeds and oil rather than their stems.) Due to new trading regulations with the European Union, the long-strawed fibre seed version needed to be reassessed. In the UK, seed certification for flax intended for long-fibre or linen production requires the seeds to be from a listed variety and inspected and tested. Unfortunately, no long-fibre varieties were available for purchase at the time of my planting last year, so I opted for the short-fibre seeds instead. I am good at developing a Plan B.
An Engaging, Hands-On Flax Growing & Processing Experience
Stepping into the beautiful rustic surroundings of Flaxland, I immediately felt a sense of belonging to the site, the process and the small group that had assembled. The literal air held creativity and passion. Armed with a brew and the wood stove lit, we delved into every stage of the flax journey, from field to fibre. Learning how to grow, harvest, and process materials was a revelation for me as a hands-on learner. It deepened my appreciation for the traditional methods, the need for greater sustainability within the textile community, and clarified the knowledge I had gained from leafing through pages and online resources. Experiencing everything in person made concepts much clearer, a sentiment shared by my cohorts.
The camaraderie and collective enthusiasm at Flaxland made me feel connected to something much larger—a lively textile community that extends well beyond Derbyshire. (Side Note: The stories about the enquiries from the global film industry for authentic flax props were fascinating.)
One of the most delightful aspects was rolling up my sleeves and getting my hands dirty (in the best possible way) with traditional tools that have been cherished for centuries. Simon had become the custodian of so much historical worldwide memorabilia, which was curated on most surfaces for all to admire.

From seed planting to breaking to using a drop spindle, each step presented unique challenges that were so much fun! Simon was incredibly knowledgeable and a passionate ambassador for keeping these time-honoured practices alive. His enthusiasm was truly contagious.
Building Connections In The Textile Artisan Community
One of the most rewarding gifts from this experience was the chance to connect with fellow textile artisans; as someone who often works solo in beautiful Derbyshire, meeting others who share the same love for textiles was a joy. We exchanged laughs, stories, artistic tips and dropped spindles, all of which encouraged creativity among us.
I've had the privilege to be in a few honest, creative circles recently - a gift hugely appreciated. In Thrupp, openly sharing different artistic approaches whilst operating machinery in the sunshine or eating our packed lunches opened my eyes to new interpretations of textile art. I left Flaxland with new skills, newfound friendships, and a treasure trove of ideas I'm eager to dive into.
Processing Flax By Hand: Traditional Techniques Using Simple Hand Tools & Mechanisation - Dressing

Processing flax is an old craft that has evolved into more efficient means. This course introduced us to basic hand tool use and simple non-electrical hand-operated wooden machinery. My favourite method was (luckily) hand tools. It had been a worry of mine that stem-to-fibre processing would require complex and expensive machines that would not sit comfortably alongside my envisaged community project brief of accessible, low-cost, sustainable means and an initiative that anyone could take part in. However, a simple wooden block, widely toothed on one side and slightly shaped on the other, paired with a dual-sized/spaced metal-toothed comb would suffice.
In this blog, I aim to document and share straightforward notes and instructions on using hand tools to prepare flax for storage or spinning. I'm doing this so I don't forget anything if I want to teach my friends in the community. Preparing flax involves a lot of steps, and some of the names were confusing for me at first. I needed to learn what each name and step meant. I won't talk about using a distaff or drop spindle right now because I'll explain those later in another post about spinning. Just so you know, drop spinning is quite tricky for me, and I'm still learning/needing more tutoring!
This before-spinning process, called 'Dressing', has three main stages: Breaking, Scutching, and Hackling.
1. How Do You Go About Breaking Flax By Hand (Simple Method)
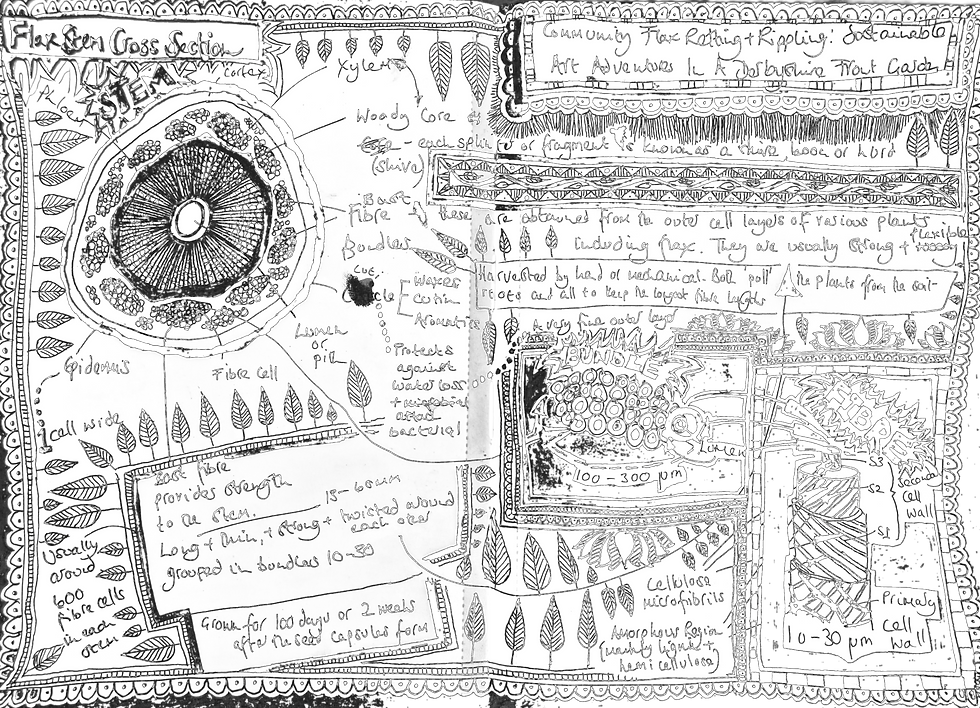
This stage takes a small bundle of stems and breaks the thicker woody inner core (made up of the pith, protoxylem, xylem and phloem layers) and outer brittle (almost thin bark-type) layers (shive) to reveal the fibres inside. Not all these 'barky' and 'corey' bits are entirely removed, but most are. My flax bundle (as I practised on my crop) was retted and dry before I started processing, and I had taken my seeds off (rippling - just used my fingers) as I wanted to keep them for perhaps another crop (shared community growing) in the coming years.
Flax breaking can be done between your fingers by just wiggling one or more stems gripped between two hands firmly up and down. Both methods aim to get the shive (outer and inner core layers) to drop away. The finger-wiggling method is also suggested when assessing if your crop is ready for harvesting. Note To Self: Make sure the stem is dry before wiggling.
Breaking is quite a messy process with a lot of shive generated, so make sure you don't mind the waste in the place where you're working.
It took around 5 to 10 minutes per bundle to hand-process. I found it a lovely, rhythmic, repetitive action that was soothing and quite mindful in the hands once you found your groove.
What You Need For Simple Hand Flax Breaking
A simple hand flax break is a wooden block that can fit into the palm of your hand. (I used a tool supplied by Flaxland with slightly rounded edges to allow the flax to break around it gently; it also doubled up as a comb used in the final step)
A firm, flat surface at waist height (like a table or workbench)

Instructions For Simple Hand Flax Breaking
A small bundle of stems (?15) is gathered with the roots all at one end and the seed heads at the other.
Jiggle these vertically in your hand til the root ends all start at the same point of the bundle. (I gently tapped the stems at the root end on the firm surface like you would to even out a handful of straws.) All nicely aligned? Then move on.
(I'm right-handed, so reverse the instructions if you prefer to use your left.) Holding firmly in the right hand around 10 cm from the roots, lay the bundle from roots to seed and east to west on the flat surface directly in front of you.
The wooden block is placed over the roots and held firmly against the bench, creating a flax sandwich with the bundle between one slice surface and one slice block.
Place the palm of the second hand (left) on the block and apply downward pressure, firmly locking the stems in your block-bench sandwich.
With the right hand, lift the unclamped stems up to form a right angle against the block to break the outer barky part of the plant. The shive should crack gently and fall away, revealing a shiny cream/white sliver of fibres beneath. The fibre lengths are the whole length of the stem, all aligned next to each other like soldiers. They're nothing like the short bolls of cotton fibre you might be used to and have pictured in your mind.
Move the block, hand, pressure and bending action around 5mm down the bundle towards the seed end and repeat to break more of the shive away.
Repeat along the bundle, holding it firm and keeping the stems aligned.
I reversed the bundle and repeated the process, going down the stems in the other direction.
Aim to get a rhythm moving the process along the length of the flax. The energy required to bend the stems can vary depending on their thickness (or woodiness.)
2. How Do I Scutch Flax By Hand Using A Wooden Break (Simple Method)?
Onto stage two scutching! Top Tip: Keep the bundle together in the same arrangement as when breaking (no further jiggling required.) I remember the function of this phase as the words are similar; basically, scutching means scraping. After breaking the stems, some parts of the shive will be stuck on the fibres by natural gums and will need further work to be removed, and that's where the scraping comes in. As less 'stuff' is stuck to the fibre stems, there is less mess than breaking; it is surprising to see how much 'dust' is generated, so a well-ventilated place is recommended. However, you'll notice how shiny the fibres become as this stage also begins polishing them. It made me remember the phrase 'flaxen hair' as it certainly ends up looking hair-like.
Like breaking, it takes 5 to 10 minutes to complete this stage. It again became a lovely rhythmic, meditative action once mastered. Feel free to experiment with how much force and grip you'll need.
What You Need For Simple Hand Flax Scutching
The simple wooden hand flax tool as above but using the sharpest edge, so we'll call it a scutching tool this time. (I used the same tool supplied by Flaxland, but historically, a scutching knife would be selected; we're just keeping this method as simple, accessible and cost-effective as possible.)
A firm, flat surface at waist height (like a table or workbench.) A professional version is known as a scutching board.

Instructions For Simple Hand Flax Scutching
Look at your wooden hand tool (which we knew as a break) and see where the sharpest cornered edge is (not the teeth bit.) This corner will be used to scrape the flax lengths.
Place the same bundle as in breaking with the roots all together, at the same length and from east to west on the bench (no jiggling this time.)
Hold the root end of the bundle with your left hand about a third of the way along the stems. Make sure you hold it tight because when you start scraping, it will use some strength and might make the bunch fall apart. One way to keep it from slipping is to wrap that first third around your hand and into the palm for a better grip.
Hold the wooden block in your right hand with the sharpest corner/edge against the bundle, apply pressure downwards, and drag it along the length from left to right to scrape off any remaining bits with a strong, even motion. This action squashes the bundle between the workbench and the tool.
Keep going until the bundle reveals clean, shiny fibres as they become polished.
Rotate the bundle by holding the seed end in your left hand around a third of the length and repeat so that the whole fibre length has been treated and all the 'bits' have been removed.
3. How Do I Hackle Flax By Hand (Simple Method)?
Hackling is combing really and works on cleaning the fibres even more and separating the shorter ones, which are not as desirable for spinning; these are called tow. Meanwhile, the long, beautiful bundles left are called stricks or lines. Don't be surprised if you lose quite a lot of your bundle as the short fibres come away (up to 50%.) Being a northern lass who hates waste, I combed this 'waste' out to see what fibres I could recover, as the quality of my spun yarn is not too concerning to me. Quantity over quality at this stage of my learning! If I adopt more professional means, a carding machine (or hand carders) can be used with the tow in the same way wool is processed, but that's future thinking.
The theory behind hackling is that passing a bundle of flax through ever finer-toothed combs produces shiny, straight, clean, and high-quality long fibres ready for spinning. The Flaxland wooden hand tool features a series of coarse teeth at one end, where this stage begins (a 'rough' hackle). I also purchased a metal comb with two sizes of rounded teeth or pins to work the flax after the rough hackle and remove even more tow.
Pre-industrialisation hackling combs from coarse to fine would have been mounted to a board (or the breaking machine) and had the bundles gently 'dropped' on and repeatedly dragged through to split and align the fibres with less manual effort. I had a go at this, and it's lovely and practical, but the kit costs, so back to basics we go.
What You Need For Simple Hand Flax Hackling
This time, the simple wooden hand flax tool from Flaxland uses the toothed edge, so we'll call it a hackling comb. (Scootch it around in your hand, and voila!)
A metal hackling comb with two sets of differently spaced teeth/pins.
A firm, flat surface at waist height (like a table or workbench.)
Instructions For Simple Hand Flax Hackling (Very Similar To Scutching)

Look at your wooden hand tool and turn it around to identify the toothed edge. This side will be used to do the first combing of the flax lengths, which is called a 'rough' hackle.
Place the same bundle as in breaking and scutching with the roots all together, at the same length and from east to west on the bench (no jiggling again.)
Hold the root end of the bundle with your left hand about a third of the way along the stems. Make sure you grip it tightly because when you start the rough or finer hackles, some pull will be applied that can drag the bunch apart. One way to keep it from slipping is to wrap that first third around your hand and into the palm for a better grip, as in hackling.
Holding the wooden block in your right hand with the toothed corner/edge against the bundle, apply pressure downwards and, with a smooth and steady motion, comb it along the length from left to right, aligning the fibres and removing the shorter ones. Stop when the fibres look straight and clean and pull easily through the teeth without snagging.
Rotate the bundle by holding the seed end in your left hand around a third of the length along, and repeat so that the whole fibre length has been combed and passes smoothly through the wooden teeth.
Swap the wooden comb for the metal version, use the widest-spaced teeth/pins, and repeat stages 4 and 5.
Now, use the finest set of teeth of the metal comb and repeat stages 4 and 5 to finally have the fibres ready for spinning.
4. How Do You Store Hand-Hackled & Combed Flax (Simple Method)?
There are ways of gently twisting the stricks for storage using a peg, but in all honesty, I haven't covered this yet. Processed flax can be stored for years and, according to Simon of Flaxland, it improves if stored under the right conditions of:
An airtight container or bag
Cool and dry
In the dark or an opaque container/bag to prevent light deterioration
There are some lovely stories of people finding stored flax in chests dating back years that has been successfully worked.
Conclusion: Crafting A Bright Community Textile Artist Future Through Hand Flax Processing

Hand processing flax by takes time and practice, but the results can be really fun and rewarding. Each step—breaking, scutching, and hackling—helps make high-quality flax fibres. The processing is very satisfying, as is admiring your stash when you've finished.
This flax processing adventure has marked a turning point in my artistic journey. I'm bubbling with excitement (in a very similar fashion to the Frome, which became the backing track for our outside lesson) at the thought of incorporating hand-processed linen into my creations—honouring the rich heritage while infusing contemporary community textile artist flair. There's something so enchanting about working with materials with such deep roots in history, and I can't wait to see where this newfound inspiration leads me.
If you're a fellow textile artist or simply curious about the vibrant realm of textiles in Derbyshire and reviving our history, I wholeheartedly encourage you to seek out experiences like the one at Flaxland, Thrupp. It's not merely about acquiring skills; the connections we build and the joy of creation make these experiences truly special. I never would've learnt about Bertas Flachs without the mention from Simon. My loved creative mycelium remains strong and ever-growing.
As I continue my journey as a community textile artist in Derbyshire, I'm immensely grateful for the knowledge and inspiration I've gained from Flaxland. Let's keep pushing the boundaries of our textile art, supporting one another, and embracing the beauty of creativity together!
Thank you Simon.
Keywords:
Contemporary community textile artist Derbyshire UK, flax processing course, Flaxland Thrupp, sustainable textiles, linen production, textile community, textile art, flax fibre, artist collaboration, traditional textile techniques, how to hand process flax


